If your audio isn’t working, reinstalling the sound driver is one of the most effective fixes. This guide walks you through the process step by step.
Why Reinstall the Sound Driver?
Drivers let Windows communicate with your audio hardware. Over time:
- Drivers can become corrupted
- Updates can cause conflicts
- Windows installs generic drivers that don’t work correctly
Reinstalling resets everything cleanly.
Step 1: Open Device Manager
- Press Windows + X
- Click Device Manager
Image

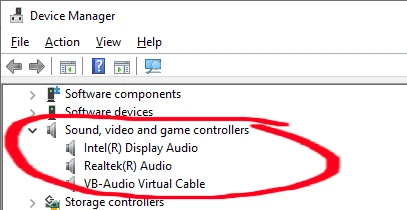
Step 2: Locate Your Sound Device
In Device Manager:
- Expand Sound, video and game controllers
- Find your audio device (e.g., Realtek High Definition Audio, Intel Audio, NVIDIA High Definition Audio)
Image
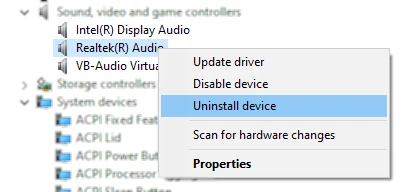
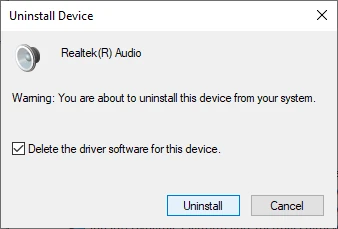
Step 3: Uninstall the Audio Driver
- Right-click your sound device
- Choose Uninstall device
- In the pop-up, check:
- “Delete the driver software for this device” (if available)
- Click Uninstall
Image
Image
Step 4: Restart Your Computer
Simply restart Windows.
- Windows will automatically reinstall a basic driver
- If the issue was a corrupt driver, this often fixes it
Image

Step 5: Update/Reinstall the Manufacturer Driver
After restart, you may be using a generic driver. To get the best performance:
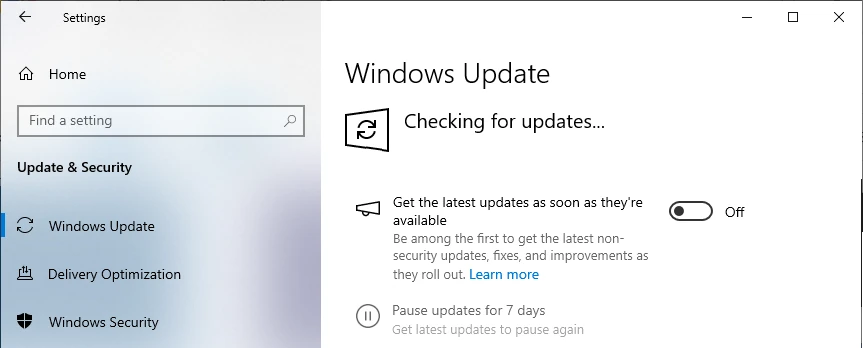
Option A — Use Windows Update
- Open Settings
- Go to Windows Update
- Click Check for updates
Image
Option B — Install the Latest Driver from OEM
Visit your device manufacturer’s support page (e.g., Dell, HP, Lenovo, ASUS), or your audio chipset maker (e.g., Realtek):
Note: if you were advised to install a particular version of a driver for compatibility we have an extensive library here: OEM Sound Drivers
- Download the latest driver for your model
- Run the installer
- Restart if prompted
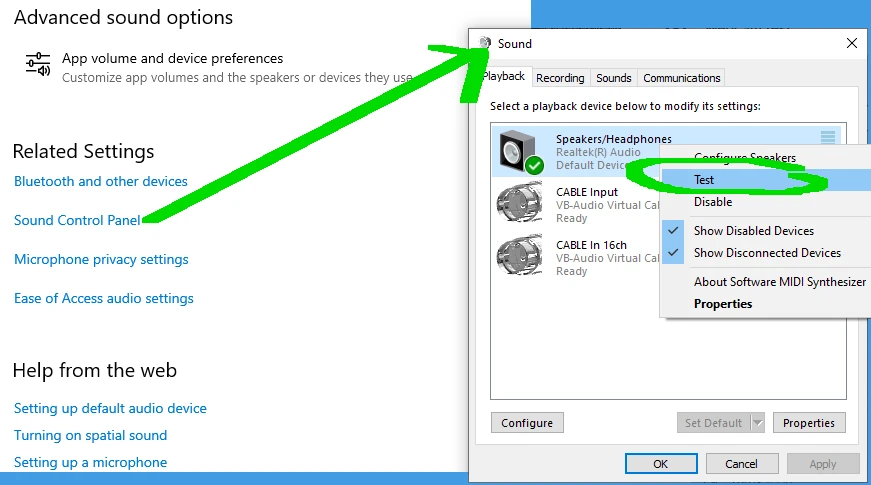
Step 6: Verify Audio Functionality
- Right-click Speaker icon in taskbar
- Click Open Sound Settings Panel
- under Related Settings click on Sound Control Panel
- Right click on output device
- Click Test
Image
Troubleshooting Tips
No Sound After Reinstall
- Check volume levels
- Test different playback devices
- Try another audio port (headphones vs speakers)
“No Audio Output Device Installed”
- In Device Manager:
Action → Scan for hardware changes - If still missing:
- Check BIOS audio settings
- Run Windows Troubleshooter (Microsoft's Online Tool)
Advanced Fixes (If Needed)
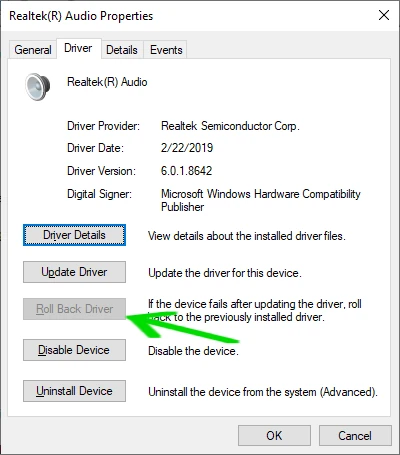
Roll Back the Driver
If the issue started after an update:
- In Device Manager:
- Right-click the audio device
- Select Properties
- Go to Driver
- Click Roll Back Driver
Image
Final Notes
- Always download drivers that match your OS (Windows 10 vs 11) and system bit-version (64-bit vs 32-bit)
- Avoid automated thirdparty driver updaters — they can install incorrect drivers, malware and ransomware.
Force Cache (Faster Mirror)